Plugin Settings
In BetterDiscord, plugins settings are very open-ended and flexible; there is no one correct way to do them. In this section we're going to look at one way to manage your settings. This includes using BetterDiscord to save and load the settings data, and making use of the getSettingsPanel function described in plugin structure.
Using getSettingsPanel is the recommended way to show a settings panel to the user because it creates a consistent flow for the user. If every plugin added a button in the Discord UI for their own settings button, it could end up chaotic. Instead using getSettingsPanel allows your plugin to have a settings button on the plugins page in the BetterDiscord settings. Most users will expect a plugin to implement this if they have settings of any kind.
Managing Settings
Structure
Typically, settings are managed and stored in the form of an object literal.
const mySettings = {
    setting1: "value",
    setting2: 0,
    setting3: [1, "foo"],
    setting4: {
        subsetting: "red",
        subsetting2: "see-through"
    },
    setting5: false
};Using an object like this has many benefits:
- Easy to read and understand
- Can hold different types of values
- JSON-compatible
- Quick lookup and addition
This can even be extended and organized further to include categories:
const mySettings = {
    colors: {
        accent: "#ff0000"
    }
    general: {
        config: {
            value: 0
        }
    }
}Where you store this object in your plugin is up to the individual developer. It may also depend on the style of plugin you create. If you use a class it may be helpful to initialize your settings in the constructor and reference it using this.settings.
Saving Settings
BetterDiscord gives you an easy way to save your settings in a JSON file using BdApi.Data.save. This function takes your plugin's name, the key you want to save and the corresponding data to save. This means you can save your entire settings object from above under a single key, or save each key invidually. See the examples below to help understand the difference.
Saving the whole settings object under a single key:
const mySettings = {
    setting1: "value",
    setting2: 0,
    setting3: [1, "foo"],
    setting4: {
        subsetting: "red",
        subsetting2: "see-through"
    },
    setting5: false
};

BdApi.Data.save("myPlugin", "settings", mySettings);{
"settings": {
"setting1": "value",
"setting2": 0,
"setting3": [1, "foo"],
"setting4": {
"subsetting": "red",
"subsetting2": "see-through"
},
"setting5": false
}
}Saving each key separately:
const mySettings = {
    setting1: "value",
    setting2: 0,
    setting3: [1, "foo"],
    setting4: {
        subsetting: "red",
        subsetting2: "see-through"
    },
    setting5: false
};

const keys = Object.keys(mySettings);

for (const key of keys) {
    BdApi.Data.save("myPlugin", key, mySettings[key]);
}{
"setting1": "value",
"setting2": 0,
"setting3": [1, "foo"],
"setting4": {
"subsetting": "red",
"subsetting2": "see-through"
},
"setting5": false
}The first options--saving the entire object under a single key--may seem redundant at first, but it allows the saving to be done in a single operation. Having it under a settings key means you can save other plugin relevant data under different keys without worrying about key collision. It also means that when you load the settings, you can load it in a single operation without having to know the keys beforehand.
Loading Settings
Similar to above, BetterDiscord gives you an easy way to load your settings from a JSON file using BdApi.Data.load. This function takes your plugin's name and the key you want to load. Just like before, you can have everything saved under one settings key, or saved individually in multiple keys. These are illustrated below.
Loading the whole settings object from a single key:
const mySettings = BdApi.Data.load("myPlugin", "settings");{
"settings": {
"setting1": "value",
"setting2": 0,
"setting3": [1, "foo"],
"setting4": {
"subsetting": "red",
"subsetting2": "see-through"
},
"setting5": false
}
}Loading each key separately:
// We have to know the keys ahead of time
const mySettings = {};
const keys = ["setting1", "setting2", "setting3", "setting4", "setting5"];

for (const key of keys) {
    mySettings[key] = BdApi.Data.load("myPlugin", key);
}{
"setting1": "value",
"setting2": 0,
"setting3": [1, "foo"],
"setting4": {
"subsetting": "red",
"subsetting2": "see-through"
},
"setting5": false
}Much like when saving the data, it's a bit more straightforward to load the entire object rather than by individual keys. Though it does mean you load everything at once instead of as-needed.
Default Settings
One common issue developers run into is default settings. Having defaults is extremely useful for when you add or adjust settings. For example, say you have a setting called color. This is fine if you only have one color-based setting. But if you add another color, calling it color is not specific enough so you change it to accentColor. But if you load a user's previous settings, it will still be called color, this can lead to unexpected outcomes.
const mySettings = BdApi.Data.load("myPlugin", "settings");
const myButton = document.getElementById("my-button");
myButton.style.color = mySettings.accentColor; // undefined{
"settings": {
"color": "red"
}
}In that example, not only would the button not be the desired color, it would remove any previously applied color as well, which is probably not desired. But how do we solve this? Defaults. If you have a set of default settings that you can extend with the loaded data, you won't end up with an undefined value. This is how it might look:
const myDefaults = {
    accentColor: "blue"
};

const mySettings = Object.assign({}, myDefaults, BdApi.Data.load("myPlugin", "settings"));
const myButton = document.getElementById("my-button");
myButton.style.color = mySettings.accentColor; // "blue"{
"settings": {
"color": "red"
}
}In this case, the button ends up blue instead of red. While not entirely desireable, it does not cause unexpected issues. This same concept can be applied to adding new settings that did not exist.
The key here is the call to Object.assign(). This function extends objects using other objects, essentially combining and overriding the keys. MDN has a great explanation of the details of how this works. In this case, the order is important. You want the loaded data to override any existing value in the default object, so the loaded data comes last in the list. You'll notice that the target object is an empty object {}. If you use the default settings object instead, that object will be modified so when you go to use it again in the future the values may be overridden. Using {} means a new object will be created and returned. An equivalent and more verbose version is shown below:
const myDefaults = {
    accentColor: "blue"
};

const mySettings = {};
const storedData = BdApi.Data.load("myPlugin", "settings");
Object.assign(mySettings, myDefaults, storedData);Settings Menu
For both of these examples below let's assume we have this simple settings scheme and defaults:
{
    buttonText: "Click Me!",
    darkMode: true
}Panel Builder
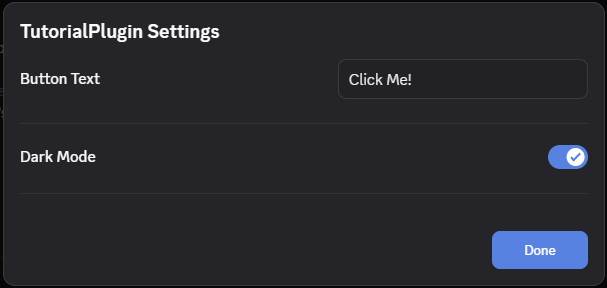
BetterDiscord now provides it's own JSON-like panel builder API. It's an incredibly convenient but still powerful API. You can see more detailed information in the UI Components section of the documentation. Here, we'll be going over how to apply this API to this specific plugin we've been building.
Create The Data
First we need to create the appropriate JSON data for these two settings.
const buttonTextSetting = {
    id: "buttonText",
    name: "Button Text",
    type: "text",
    value: "Click Me!"
};

const darkModeSetting = {
    id: "darkMode",
    name: "Dark Mode",
    type: "switch",
    value: true
};This has already done most of the work for us as it will give us a proper UI including input, labels, keyboard navigation and more. But in order to make this usable in our plugin, we need to wrap this in our buildSettingsPanel() API. We can return that directly to getSettingsPanel() leaving our plugin looking something like this:
/**
 * @name TutorialPlugin
 * @author YourName
 * @description Learning how to make BetterDiscord plugins!
 * @version 0.0.1
 */

module.exports = meta => {

  return {
    start: () => {

    },
    stop: () => {

    },
    getSettingsPanel: () => {
        const buttonTextSetting = {
            id: "buttonText",
            name: "Button Text",
            type: "text",
            value: "Click Me!"
        };

        const darkModeSetting = {
            id: "darkMode",
            name: "Dark Mode",
            type: "switch",
            value: true
        };

        return BdApi.UI.buildSettingsPanel({settings: [buttonTextSetting, darkModeSetting]});
    }
  }
};This gives us a decent looking settings panel right out of the gate.
Reacting To Settings
But how do we actually save and use these settings? We simply add an onChange to the settings panel and check the IDs.
BdApi.UI.buildSettingsPanel({
    onChange: (_, id, value) => mySettings[id] = value
    settings: [buttonTextSetting, darkModeSetting]
});Note that the _ here represents the group id but since we have no groups, we don't need it. Otherwise, it's incredible straightforward to update our settings object.
Final Builder Panel
To prove it really works and is that simple, let's combine this plugin with the one we made in the DOM tutorial. Splicing them together gives us something like this:
/**
 * @name TutorialPlugin
 * @author YourName
 * @description Learning how to make BetterDiscord plugins!
 * @version 0.0.1
 */

module.exports = meta => {

    const mySettings = {buttonText: "Click me!", darkMode: true};

    const myButton = document.createElement("button");
    myButton.addEventListener("click", () => {window.alert("Hello World!");});

    function updateButtonText() {
        myButton.textContent = mySettings.buttonText;
    }

    function updateButtonTheme() {
        if (mySettings.darkMode) {
            myButton.style.color = "white";
            myButton.style.backgroundColor = "black";
        }
        else {
            myButton.style.color = "black";
            myButton.style.backgroundColor = "white";
        }
    }

    return {
        start: () => {
            Object.assign(mySettings, BdApi.Data.load(meta.name, "settings"));
            const serverList = document.querySelector(".tutorialContainer__1f388");
            serverList.append(myButton);
            updateButtonText();
            updateButtonTheme();
        },
        stop: () => {
            myButton.remove();
        },
        getSettingsPanel: () => {
            const buttonTextSetting = {
                id: "buttonText",
                name: "Button Text",
                type: "text",
                value: mySettings.buttonText
            };

            const darkModeSetting = {
                id: "darkMode",
                name: "Dark Mode",
                type: "switch",
                value: mySettings.darkMode
            };

            return BdApi.UI.buildSettingsPanel({
                onChange: (_, id, value) => {
                    mySettings[id] = value;
                    BdApi.Data.save(meta.name, "settings", mySettings);
                    if (id === "buttonText") updateButtonText();
                    if (id === "darkMode") updateButtonTheme();
                },
                settings: [buttonTextSetting, darkModeSetting]
            });
        }
    };
};Be sure to take note of the change in our onChange function where we call updateButtonText and updateButtonTheme to make the plugin truly reactive to the settings. But importantly we're doing all of it including saving the settings from a single simple listener. This API scales well and the settings can be generated programmatically fairly easily so you don't need to manually create the JSON data. To dive deeper check the settings section of the UI components documentation.
Classic HTML
Since we're using getSettingsPanel() we need to create an html element that not only represents our settings, but allows the user to change them. The best way to do this is to turn each setting into an input and display it to the user.```
The first setting, buttonText is a string, which is best represented by a text input input[type=text]. The second, darkMode is a boolean, best represented by a checkbox input[type=checkbox].
Create The HTML
So if we were doing this with just html, it might look something like this:
<div id="my-settings">
    <div class="setting"><span>Button Text</span> <input type="text" name="buttonText"></div>
    <div class="setting"><span>Dark Mode</span> <input type="checkbox" name="darkMode"></div>
</div>So let's build this with JavaScript.
const mySettingsPanel = document.createElement("div");
mySettingsPanel.id = "my-settings";


const buttonTextSetting = document.createElement("div");
buttonTextSetting.classList.add("setting");

const buttonTextLabel = document.createElement("span")
buttonTextLabel.textContent = "Button Text";

const buttonTextInput = document.createElement("input");
buttonTextInput.type = "text";
buttonTextInput.name = "buttonText";

buttonTextSetting.append(buttonTextLabel, buttonTextInput);


const darkModeSetting = document.createElement("div");
darkModeSetting.classList.add("setting");

const darkModeLabel = document.createElement("span")
darkModeLabel.textContent = "Dark Mode";

const darkModeInput = document.createElement("input");
darkModeInput.type = "checkbox";
darkModeInput.name = "darkMode";

darkModeSetting.append(darkModeLabel, darkModeInput);


mySettingsPanel.append(buttonTextSetting, darkModeSetting);It's a bit long winded, but that's how it would look using vanilla js with no helper functions. Nonetheless we have a mySettingsPanel which represents the html we created. Let's put this into a plugin and see how it looks. Don't forget to return your mySettingsPanel!
/**
 * @name TutorialPlugin
 * @author YourName
 * @description Learning how to make BetterDiscord plugins!
 * @version 0.0.1
 */

module.exports = meta => {

  return {
    start: () => {

    },
    stop: () => {

    },
    getSettingsPanel: () => {
        const mySettingsPanel = document.createElement("div");
        mySettingsPanel.id = "my-settings";


        const buttonTextSetting = document.createElement("div");
        buttonTextSetting.classList.add("setting");

        const buttonTextLabel = document.createElement("span")
        buttonTextLabel.textContent = "Button Text";

        const buttonTextInput = document.createElement("input");
        buttonTextInput.type = "text";
        buttonTextInput.name = "buttonText";

        buttonTextSetting.append(buttonTextLabel, buttonTextInput);


        const darkModeSetting = document.createElement("div");
        darkModeSetting.classList.add("setting");

        const darkModeLabel = document.createElement("span")
        darkModeLabel.textContent = "Dark Mode";

        const darkModeInput = document.createElement("input");
        darkModeInput.type = "checkbox";
        darkModeInput.name = "darkMode";

        darkModeSetting.append(darkModeLabel, darkModeInput);


        mySettingsPanel.append(buttonTextSetting, darkModeSetting);

        return mySettingsPanel;
    }
  }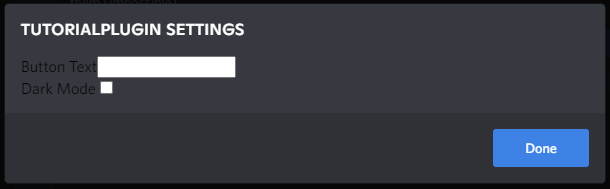
};Enable your plugin in settings, and click the plugin settings button. You should get something like this:
Reacting To HTML
It's not very pretty right now, but that's okay because we're focusing on functionality for the purpose of this tutorial.
Speaking of functionality however, this panel doesn't do much. It does not show the current value and it does not respond to updates by the user. Let's fix that.
// Input element from above
buttonTextInput.value = mySettings.buttonText; // Value stored somewhere
buttonTextInput.addEventListener("change", () => {
    mySettings.buttonText = buttonTextInput.value;
});

// Input element from above
darkModeInput.value = mySettings.darkMode; // Value stored somewhere
darkModeInput.addEventListener("change", () => {
    mySettings.darkMode = darkModeInput.value;
});Now if you combine this with the previous code, you'll get a lot of repeating operations. This can be cleaned up in a few different ways, in this tutorial we are opting for a small helper function.
function buildSetting(text, key, type, value, callback = () => {}) {
    const setting = Object.assign(document.createElement("div"), {className: "setting"});
    const label = Object.assign(document.createElement("span"), {textContent: text});
    const input = Object.assign(document.createElement("input"), {type: type, name: key, value: value});
    if (type == "checkbox" && value) input.checked = true;
    input.addEventListener("change", () => {
        const newValue = type == "checkbox" ? input.checked : input.value;
        mySettings[key] = newValue;
        BdApi.Data.save(meta.name, "settings", mySettings);
        callback(newValue);
    });
    setting.append(label, input);
    return setting;
}Which makes our getSettingsPanel() look a little easier to digest
const mySettingsPanel = document.createElement("div");
mySettingsPanel.id = "my-settings";

const buttonText = buildSetting("Button Text", "buttonText", "text",
                                mySettings.buttonText, updateButtonText);
const darkMode = buildSetting("Dark Mode", "darkMode", "checkbox",
                              mySettings.darkMode, updateButtonTheme);

mySettingsPanel.append(buttonText, darkMode);As we can see here, this will now allow the saved value of the settings to be shown when the panel opens, and it will also allow the user to update the settings. And thanks to our helper function, these values will also be saved.
Final HTML Panel
If we put all the pieces together and combine it with the button we made in the DOM section, we might end up with a plugin like this:
/**
 * @name TutorialPlugin
 * @author YourName
 * @description Learning how to make BetterDiscord plugins!
 * @version 0.0.1
 */

 module.exports = meta => {

    const mySettings = {buttonText: "Click me!", darkMode: true};

    function buildSetting(text, key, type, value, callback = () => {}) {
        const setting = Object.assign(document.createElement("div"), {className: "setting"});
        const label = Object.assign(document.createElement("span"), {textContent: text});
        const input = Object.assign(document.createElement("input"), {type: type, name: key, value: value});
        if (type == "checkbox" && value) input.checked = true;
        input.addEventListener("change", () => {
            const newValue = type == "checkbox" ? input.checked : input.value;
            mySettings[key] = newValue;
            BdApi.Data.save(meta.name, "settings", mySettings);
            callback(newValue);
        });
        setting.append(label, input);
        return setting;
    }


    const myButton = document.createElement("button");
    myButton.addEventListener("click", () => {window.alert("Hello World!");});

    // highlight-start
    function updateButtonText() {
        myButton.textContent = mySettings.buttonText;
    }

    function updateButtonTheme() {
        if (mySettings.darkMode) {
            myButton.style.color = "white";
            myButton.style.backgroundColor = "black";
        }
        else {
            myButton.style.color = "black";
            myButton.style.backgroundColor = "white";
        }
    }
    // highlight-end

  return {
    start: () => {
        Object.assign(mySettings, BdApi.Data.load(meta.name, "settings"));
        const serverList = document.querySelector("#app-mount");
        serverList.append(myButton);
        updateButtonText();
        updateButtonTheme();
    },
    stop: () => {
        myButton.remove();
    },
    getSettingsPanel: () => {
        const mySettingsPanel = document.createElement("div");
        mySettingsPanel.id = "my-settings";

        const buttonText = buildSetting("Button Text", "buttonText", "text",
                                        mySettings.buttonText, updateButtonText);
        const darkMode = buildSetting("Dark Mode", "darkMode", "checkbox",
                                      mySettings.darkMode, updateButtonTheme);

        mySettingsPanel.append(buttonText, darkMode);
        return mySettingsPanel;
    }
  }
};The new pieces here are the update functions updateButtonText and updateButtonTheme which are pretty straight-forward if you read through them. Otherwise, feel free to save this into your plugins folder and give it a test run. If you completed this section, you've successfully learned how to make a plugin with settings that actually work!
When you're ready to move on, check out the next chapter, UI Components, that goes over different UI elements within Discord and BetterDiscord.